At ESD®, our mechanical coin slides and electronic card-operated payment systems are compatible with nearly all washers and dryers on the market! As the inventors of the ESD coin slide, we have created a streamlined system, making accepting payment a breeze for laundromat owners and operators.
Our revolutionary vertical coin slide sets the standard in the industry today. In addition to laundromats across the globe, nearly every pool table, foosball table, and sticker machine in America is equipped with an ESD coin slide. Because these coin slides are so widely used and prices fluctuate often, we wrote out step-by-step instructions on how to change the price on a standard ESD coin slide with a red audit extension handle below.
Step 1: gather what you need
Before getting started you’ll need a few simple things to change the price. Grab the amount of quarters for your new price (or the old price if it’s higher) and a Phillips head screwdriver and you’re ready to go.
Step 2: disengage the return spring
When working with the coin slide, you’ll want to first disengage the return spring from the extension. Then you’ll want to load the quarters into the handle and push forward until the quarters drop.
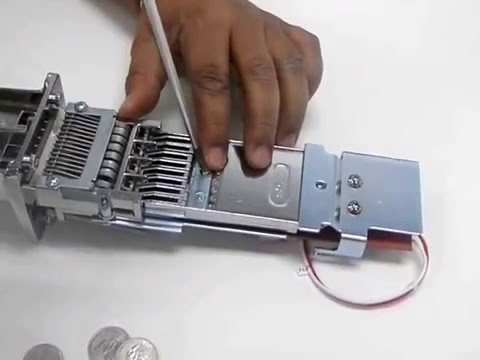
Step 3: loosen the spring bracket
Using your Phillips head screwdriver, you’ll want to loosen up the spring bracket on the back. This will give you access to the storage which allows you to set your new price.
Step 4: clean the storage area
Once you’ve loosened the bracket and have accessed the storage, you’ll notice a few random inserts loosely connected. Remove those and place them on the side first before turning the slide upside down with the handle extended. Once upside down you’ll see the insert plates that you’ll need to unscrew with your screwdriver. Once screws are removed, it’s time to remove the plate.
Step 5: adjust the price
Now you’re ready to change the price of your coin slide! Take the quarter inserts from the storage that you took out earlier and place them where the blanks are in order to accept more quarters (or remove more to lower the price).
Step 6: reassemble the coin slide
Once the price is set where you want it, it’s time to repeat all steps from before, but in reverse. First you put the plate and screws back in place and tighten them with your screwdriver. Then you turn the slide upside down, retract the handle, and install the spring bracket and its screw.
Step 7: test it out
Once the handle is in neutral position and everything is assembled, load in the quarters for the new amount and push the handle in. If everything runs smoothly, you’re ready to go. The last step is to change the decal to your new price to alert customers of the price accepted with the coin slide, and you’re good to go!
If you are more of a visual learner, we put together a video that can help. Click here to view the video or contact our team for more help.